Monday, 31 October 2011

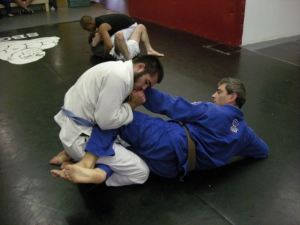
Gi Wrap Cross-Choke From Guard

Image shows your regular cross choke.  In the gi wrap version the lower hand in this choke will be gripping the left jacket lapel that has been fed up and over the opponent's shoulder, the upper hand will have a solid grip on the material at the left shoulder or the left lapel.


Gi wrap cross-choke:
-         When pulling guard, try to kick opponent’s gi behind him.
-         Break opponent’s posture, pulling him close to you.
-         Take the hand that is on the same side as the free gi collar and grab it (or grab with opposite hand and feed to same side hand).
-         Use this collar to keep opponent’s posture broken by pulling down.
-         Take your free hand, reach behind the opponent’s head, gripping on his shoulder.
-         Move the shoulder gripping forearm under your opponent’s chin, flare out both elbows and pull your opponent down towards your head for the tap.

Thursday, 27 October 2011

Defense Soap Review (An ongoing effort)


Skin infections and BJJ are just a fact of life (I may do a blog entry on them later).  I don't care how clean you keep the mats at your gym.  Thirty minutes into a hard class and there's sweat, blood, spit, and scraped skin somewhere on them.  It helps to keep your gear clean, shower immediately after each class, and always try to keep the mats clean of course . . . but sometimes infection is unavoidable.

Diseases in grapping come in three basic forms: Bacterial (including MRSA, regular staph, impetago, etc), Fungal (ringworm), and Viral (herpes).  Defense soap claims to work against all three on their website.  The big question of course, is does it work?  Defense soap is expensive to buy (6 - 7$ per bar) and pretty hard to find in local stores.  I found out that it's much cheaper to buy if you get several bars . . . so I'm the proud new owner of 12 bars of defense soap.

First impressions . . . well, it looks like soap.  Kinda has a medicinal stinky sort of smell that's not awful but not really awesome either.  Lathers up pretty well, and seems like it's a little less drying to the skin than the Dial antibacterial soap that I had been using.  So far I've used it after one class.  This is where the 'ongoing effort' comes in.  Every couple months I'll update this article to let people know if I've caught anything or noticed anything different about the soap.  Just to have some full disclosure here . . . I use KS Skin Cream, wash my gear immediately after every class, and shower before going home after each training session.  (You would think that that alone would keep me from getting infections . . . sigh.  Why does this awesome sport have to be so gross sometimes?)

Tuesday, 18 October 2011

Rear Naked Choke and Mount Escapes

Turning to the side and pulling the choking arm

Basic Rear Naked Choke Escape:
- Turn your head so that the chin is in line with the choking elbow.
- Put both hands on the choking arm and pull down for space.
- Bridge up and onto your opponent's chest, then turn to the side that the choking arm is on.  Try to get on your shoulder and one foot.
- Use your higher foot to push the opponents lower hooking leg off of you and to the ground.  Keep your weight on it.
- Slide your lower leg through the space created between your upper leg and the opponent's pinned leg.
- Push your weight back and onto the opponent's chest while walking both legs around and towards the opponent's head.
- Once your body is perpendicular to the opponent, spin towards his legs and land in side control.

Be aware that when attempting this escape if the opponent grabs your hand he will likely throw a leg over your and attempt to mount.


Hooking the leg with your heel

Hooking Leg Mount Escape:
- If your opponent has high mount on you, put both elbows against his thighs and push down.  Walk up with your legs at the same time.
- Once your opponent is closer to your hips, Upa to one side.  Using the space created by the Upa, turn slightly to one side.
- Reach your higher leg over your opponent's leg and drag the leg back towards you using your heel.
- Once the opponent's leg is caught between your legs, frame hard on your opponent and switch your hips over to get to half guard.

Sunday, 16 October 2011

Open Guard: Guillotine to Head and Arm Control

Yesterday we were working more of a wrestling move than a Jiu-Jitsu one.  This technique is used to transition from a defensive position (you sitting in butterfly or on your side with your opponent standing and free of your guard, trying to pass) into an offensive one.


You want to keep a more upright posture than the guy on the bottom here
Snap Down to Guillotine
- Use one arm to stiff arm and push your opponent away, pushing around the shoulder area.
- If your opponent starts to lean in to grab your feet or to collapse down on you, use this pushing arm to cup the back of his head.
- Pull his head straight down.  Take your other arm and place the edge of your wrist under his neck (thumb up).
- Lock the technique in by grabbing your wrist and pulling up, while pushing his head into your chest.

Typically you would start to fall back for the guillotine at this point, but keep yourself more upright.  The goal of this neck attack is to surprise your opponent and get them to raise their hands to defend the choke.  Once their hands start rising:

Pushing the choking arm through and locking it - Just like working an anaconda
Guillotine to Head and Arm control:
- Push your choking hand deep under the opponent's neck and past his arm.
- Use the bend in your other elbow to lock in the choking hand (as if you were attempting an anaconda choke)
- Lean your chest pressure on your opponent and escape your legs so that you can come up to your knees
- Twist the elbow/hand that you have locked together deep under your opponent and walk backwards to flatten your opponent out.
- Now you can work towards his side or back from a more dominant position.

Saturday, 15 October 2011

Eddie Bravo's Half Guard Game (Old School + Electric Chair)


Yesterday in our nogi class we went over the first set of moves in the half guard chapter of Eddie Bravo's 'Mastering the Rubber Guard'.  There are definitely some little things that aren't well explained in the book that you need to figure out to do the moves.  By the end of class stuff started to make a whole lot more sense to me.


Lockdown (pulling opponent back)


Lockdown: 
- You're in half guard and have been completely flattened out, opponent is putting pressure on your jaw.
- Clamp your knees together around the opponent's trapped leg and square up your hips (without squaring up your hips sometimes it can be really hard to wrap your legs to the lockdown position.
- Take your outside leg and wrap it over the opponent's trapped leg.
- Take your inside leg, and wrap it over the opponent's trapped leg and your other leg.
- Hook your inside leg under the opponent's ankle.
- Squeeze your legs tight together

Jaws of Life:
- You have the lockdown on your opponent and only one underhook.
- Take your (not underhooked) arm and frame it in front of your opponent's face
- Push up and quickly drop your elbow down into the free space created to secure your other underhook.

Whip Up:
-You have both underhooks and the lockdown on your opponent
- Release the underhooks and bring your hands to your opponent's armpits, rib cage, or (if you're really deep) waist)
- Try to lift your lockdown as high as possible in one quick jerk (knees to your head if possible).  At the same time, push up and over your head with your hands.
- In the space created, secure a deep underhook, and turn up on your other elbow.

You usually want your head tighter to the guys chest than in this picture.


Now you can either ditch the lockdown and go to the Old School sweep, or maintain the lockdown and go to the Electric Chair sweep/submission.


Foot grabbing action


Old School Sweep:
- You're in half guard, with lockdown and a deep underhook.
- Reach under your opponent and grab under his foot (palm up)
- Put your head to the ground.  Use it to base and stick your ass up in the air.  This allows you to get to your knees.
- Pull the leg towards you and push with your head towards the opponent's chest to complete the sweep.


Electric Chair submission position

Electric Chair Submission/Sweep:
- You're in half guard, with lockdown and a deep underhook.
- You reach for the Old School sweep, but the opponent bases his leg out wide.
- Dive your head in towards the leg that's based out.  Grab under it with the hand that's on that side.
- Take your other hand and grab under the opponent's rib cage and pull him up on top of you.
- Wrap one arm around his leg and squish it to your ear, while stretching your opponent out with the lockdown.  This is the electric chair submission.
- If that doesn't work, unhook the lockdown and keep driving forwards towards your opponent until you have his back pinned to the mat with the leg you've trapped next to your ear.  You should be able to step over his remaining leg easily into side control.

Friday, 14 October 2011

Overtraining


Like most guys involved in our sport, I like to stay pretty active.  I lift weights twice a week, do BJJ classes 3-4 times a week (for 2-3 hours a session), and go jogging.  When the summer rolls around I like to play some soccer now and again and go biking too.  There's always something to do.  Like most of us in Jiu Jitsu, I like to push myself hard when working out.  It's not a rare occurance to have aching muscles and some pains when getting out of bed in the morning.  How do you know when you really have to take note of those little aches and pains, and how do you know that you're just being a pussy?  If I spend a couple weeks without exhausting myself I'll have trouble sleeping and tend to get bummed out a lot.  My wife thinks that I'm kinda crazy. 

No doubt exercise is definitely good for you.  The flip side of this, of course, is that too much exercise without enough rest will slowly wear you down.  Many people I've talked to about this have experienced 'overtraining' - that burned out feeling that you sometimes get.  It's an occupational hazard when you're trying to push yourself.

1. Check your Performance - When you lift weights, track your numbers.  If they're steadily going down then you're pushing too hard.  I like to climb 12 flights of stairs every morning to get to my desk at work.  When I start to feel exhausted on the 5th floor, I know that I need to take it easy.
2. Check your Attitude - Going to Jits is normally a blast for me.  If I'm dreading it, or dragging my ass around the house to get ready, there's definitely something up.  Also, if I'm in class and I start to feel very frustrated . . . usually it's because I'm not thinking properly.  When that happens it's usually because I'm exhausted and am having trouble fitting together the little pieces of a particular move.
3. Check your resting heart rate and weight - I run between 40 - 45 bpm and about 185-190lbs.  When it starts to hit closer to 55 or so, or if my weight starts to drop down to 180lbs I know there's a problem.

So, OK . . . you've diagnosed that you're starting to push to hard.  What do you do?

1. Sleep - This is often my number one problem.  Many of my classes are late at night, and I've got to be up early to beat traffic and get in to the office.  I aim for eight hours minimum during a night, but not being able to sleep because of being too pumped up or waking up several times to relieve all that water that I was chugging in class is a normal occurrence.  My advice, spend at least a half hour reading to calm your mind before bed.  Keep to a sleeping schedule as much as possible so your body's natural rhythm will tell you when it's time to sleep.  Don't drink or eat anything with caffeine within 5 hours of your bed time.
2. Nutrition - I try to eat a pretty clean diet, so this is not usually my problem.  Back in my university days though . . . holy crap.  Yes, you can survive on ramen noodles and apples for six months at a time.  Yes, it will seriously hurt your athletic performance.  No surprises in this category.  Eat lots of fruit and veggies each day (roughly half of each meal), eat protein (cottage cheese, yogurt, quinoa, chicken breast, fish, are all great), eat good fats regularly (almonds, walnuts, sunflower seeds, a little dark chocolate, etc.).
3. Resting Your Body - Marathon day in/day out sessions will wear anybody down.  I've tried a couple approaches to solve this problem, each has it's benefit/disadvantage.
  A - Dedicate at least one day a week off as a rest day.  This lets you go pretty hard on your other days and then just snooze/read/watch TV and do some light stretching on your day off.  (Also, use that day off to sleep in a little bit).
  B - Pace yourself.  Basically when you start feeling tired the idea is to reduce your weights, roll for 3 rounds rather than six after class, or sub off more in soccer.  You really have to be on the ball to make this work for you . . . when I'm in class, I'm pumped up and just want to keep going and going.  You have to learn to feel if you're really tired or not.

Hope this helps!

Thursday, 13 October 2011

Half Guard Passing Tip - Flattening Out Your Opponent


It was a rough night last night at the tournament training class.  Was still sore from weights on Monday, and tired from no-gi class on Tuesday.  When I started training again after my break I decided to spend some time focusing on parts of my game that have always been weak, and half guard is right at the top of that list.  I can mow through pretty much all of the white belts half guards, and usually do OK from the bottom when they’re trying to pass . . . the blue belts are really on a different level though, and I’m happy whenever I can get a pass from one.  On the bottom of half I’m getting steamrolled by them.

Anyways, I got some advice from a friendly purple belt regarding passing half guard.  See, I have some good passes that I know, but am having trouble flattening guys out to the point that I can start to use them.  He showed me the following technique which should help me with some of the pesky deep half guard players:

Half Guard Passing – Flattening Out Opponent:
-         Opponent is starting with you in half guard, they have knee up and blocking your upper body, they have the underhook, and they are deep (maybe reaching under your legs with the other hand)
-    Use your top arm to shove the blocking knee a couple inches back to take the frame away.
-         Now it's time to fight for the underhook.  Take the arm that’s being hooked and use the elbow to wedge it under their arm.
-         If this doesn’t work, take the hand of the arm that’s being underhooked, and grab your opponent’s bicep.  Push the bicep back towards the mat to flatten your opponent out.
-         Next replace the top hand that’s pushing on the bicep with your bottom hand (and continue to push them back/down).  Work the top hand under your opponent’s arm and secure the underhook.

Wednesday, 12 October 2011

Taking the Back When Opponent Turtles Up

We did mostly free sparring yesterday, but spent some time covering the following:


Fighting For Rear Naked Choke:
-         From rear mount, slide one arm under the opponent’s jaw, and try to pull their chin up.
-         Immediately slide your opposite hand into the space created by this movement
-         Continue to do this back and forth until you sink one arm in deeply.


Taking the Back When Opponent Turtles Up:
-         Opponent starts turtled up with their head directly infront of you.
-         Put your chest on their shoulders and sprawl back with both legs out straight (so they can’t grab a leg)
-         Spin to one side, keeping pressure on their shoulders with your chest, stop when you get almost behind them.
-         Grab their close wrist with your close arm, hook your far arm under their far shoulder, and pull them up until you’re in a squatting position.
-         Hook your leg in under the wrist that you’ve grabbed.  Fall to that side.
-         Hook your other leg in on the other side.
-         Work one arm across for the choke

Tuesday, 11 October 2011

Strength Training - Routine #2


Front Squat                  160               1:30
Bench   Press               157               1:30
Bent OverRow            140                0:45
Military Press             100                1:30
Deadlift                       245                 1:30

A buddy at my old gym convinced me to try this barbell workout out, and it seemed to work pretty well.  It’s a pretty simple powerlifting kind of thing – five exercises and you do five sets of five reps for each one.  I leave about a minute and a half between sets (except for the bent over row, which I leave only 45 seconds for at the moment).  This routine is designed specifically for full body bursts of power, and you will quickly notice a lot more strength on the mats a couple weeks after starting it.

Each lift should be done quickly and smoothly.  I started out doing half of my max weight for each lift (to perfect my form for each), and added about 5lbs to each lift every week.  Remember to squat ass to the ground, touch the bench press to your chest before raising it, and keep your back straight for the bent over row.  This routine takes me about 80 minutes depending on energy levels.

I haven’t been able to add 5 lbs for most of the lifts in a while, but I’m still hoping for another 5 on the military press and bent over row before I switch this routine out for something different.

Sunday, 9 October 2011

Half Guard Sweep and Lazy Half Guard Pass

We were building on the half guard again yesterday in class and we learned a kind of 1-2 combo.  The basic sweep from your half guard takes you on top and usually into your opponent's half guard.  Then you work the lazy pass to get side control.  I really liked this pass.  You keep solid weight on your opponent the whole time, and don't have to spend much strength to keep him held down tightly.


Basic 1/2 Guard Sweeps:
- Start with your opponent's leg trapped and your shin pressed against his hips/torso to keep him from advancing.

- Immediately kick the leg that's on your opponent's torso up as high as possible.  This should give you enough space to get your arm in for an underhook.
- Using the underhook (and keeping your head tight to your opponent's chest) unlock your legs and come to your knees.
- If your opponent pushes into you to try and flatten you out, grab under their thigh and pull them hard in the direction they're pushing you.  Ideally they should go right over top and be swept.
- If your opponent tries to regain his base, grab his far foot and pull it towards you as you push into him (Old School sweep).

In case you get trapped in your opponent's half guard after sweeping:


Lazy Half Guard Pass:
- Start with your opponent locking your right leg and their shin pushing on your right side.

- Push their shin back to your right so you can collapse onto your opponent.
- Take your left arm and reach deep under your opponent's left shoulder, tight to their body.
- Take your right hand and grab under their left leg, pull it up towards their head to lock them in position
- Move your hips off the opponent momentarily to slide your left knee across the opponent's stomach.
- Free your right leg by pushing with the left and pulling with your right arm (this is the arm under your opponent's leg)
- Keep your left leg tight against the opponent's side and follow them as they try to shrimp away once you've freed your leg.

Saturday, 8 October 2011

Half Guard Basics

Today in class we reviewed some of the basics behind the basic half guard position, then we spent most of the rest of class rolling and getting our partners to make sure that we're not forgetting anything obvious.  This refresher has been much appreciated since I've managed to forget everything about half guard since my break.


Half Guard Tips:
- Triangle your legs (at least initially) around the other guys legs to keep your opponent from easily stepping out from your half guard.
- Always fight for the underhook.  When you get the underhook, keep it held as high as possible under your opponent's arm.  A lazy underhook can lead to a Darce choke, and just makes it easier for your opponent to work.
- Use the hand that you're not underhooking with to block your opponent's free hand.  (This is used to prevent the crossface and to just generally control him better.)
- Always keep on the side of your hip.
- Keep your head against your opponent's chest.  (Ear to his heart).  This gives your opponent less room to manouver with, and makes it a little harder to set up chokes against you.

Back Door Escape:
- Secure half guard (legs triangled, high underhook, on your side, head to opponent's chest)
- Open your leg triangle.
- Take your outside leg and hook it around your opponent's trapped leg.  Pull this leg out.
- Use the space you just made to get to your knees.

Additional Half Guard tips:
-         Always use your free hand to control the opponent’s hands.  This can be very effective in preventing them from passing 
-         Be very careful about chokes (guillotine, d’arce) if you’re sitting up and pressing your head against your opponent’s chest.  If you get to that position, work on your sweep or escape quickly.

Friday, 7 October 2011

Strength Training - Routine #1

I know that strength training and BJJ can be a contentious issue.  I've heard many "Don't do it because. . ." arguments.  It'll slow you down, it'll make you too heavy, you'll use your strength not your technique.  Personally, I've tried doing BJJ with weight lifting and without.  Without lifting I tend to lose muscle mass very quickly.  With no weight lifting I was competing at 175lbs and always felt like the people I fought against were way stronger than me.  With weight lifting I'm walking around at about 185-190.  I've noticed that I get fewer injuries when carrying around a little extra muscle and in my mind, more mat time means better Jiu-Jitsu.  That said, there are good and bad ways to lift weights, and I've tried to develop a strategy that seems to work for me the most in my BJJ.  For me this involves compound lifts and lots of leg work.

I've broken up my weightlifting into two full body routines.  I like to hit 3-4 jits classes a week, and when you throw in some jogging, the occasional soccer game, and some Muay Thai now and again there's I don't feel like there's enough time to add more sessions than that.  Last night I completed my workout #1 . . . the goal of this workout is to develop power and some weightlifting endurance.  My other workout is completely about generating power.

What I did last night (takes a little under an hour):
Clean and Squat (170lbs)    3 sets of 3 and 1 of 1
Bench (155lbs)    1 set of 10, 1 set of 7
Front Squat (155lbs)    2 sets of 5
1 Arm Row (80lbs)    1 set of 12, both sides
Standing Press (60lbs each hand)    2 sets of 5
Shrug (60lbs each hand)    1 set of 20
Pull-Ups (BW)    1 set of 12
Lunges (60lbs each hand)    1 set of 10, both sides

The clean and squat is a great exercise.  For each rep you power clean a weight from the floor up into the front squat racking position, then you do a front squat (all the way down to the bottom - don't get lazy), then lower the weight down to the floor.  The exercise is done quickly and smoothly with about a minute and a half between sets.  This exercises works a ton of the muscles in your body.  It's especially great for your quads, hips, and traps . . . and these muscles get heavy use in most of your BJJ exercises (bridging, pulling the guy towards you, driving forward while standing, etc).

The bench is done with endurance in mind.  I'm aiming to get two sets of 10 out, but I'm still working towards that mark with this weight (I can do it with 150).  I take about a minute between sets.  Applicability: Framing when you're on the bottom!

Ass To Grass Front Squats . . . pure awesome.

The front squat is thrown in to add some extra work for the legs.  Make sure it's a smooth, quick down and up motion, don't lean too far forwards, and squat ass to the grass.  I like the front squat for a two reasons . . . it seems to really work your stomach and back muscles more than the back squat, and it's an easy lift to bail from (just throw the weight forward if it's too heavy).  Bailing from the lift is important since I do my workouts in the basement without a spotter most of the time.  About a minute and a half between sets seems good for this lift.  Applicability: almost everything that the clean/squat is good for.

The 1-arm row motion is probably the most fundamental movement that you do in BJJ.  Grabbing a guy's sleeve and pulling is used all the time be it arm drags, better positioning while standing, or setting up an armbar from guard.

The standing press is the kind of exercise that lets you know how in shape you are.  You start out with both dumbbells on the floor, then you grip them, drive your heels into the ground, and in one fluid motion push the weights up over your head.  When you do them explosively you can feel your whole body working hard.  It's kinda like doing a weighted burpee.  Applicability:  Well, it's got the squatting motion in there and you're using lighter weights so it's easier to explode quickly.  I also like this one for the ab/back strength that you need as you're lifting the dumbbell up over your head.

The shrug is something I'm thinking of taking out of my routine.  I don't remember why started doing it originally . . . probably because it's a pulling motion.  I'll be playing with taking it out and replacing with something better at some point in the future.  I start standing with both dumbbells at my sides and raise them up as close to my armpits as possible.

Pull-ups.  Everybody likes these.  Palms towards your face, for some added grip (finger) strength I do these from a steel I-Beam in the basement.  Since I can't grip the I-beam it forces me to hold my fingers at about 90 degrees to complete the pull-up.  I tell myself that this is hardcore, but really I'm too cheap to buy a pull-up bar.  :P

Finally the lunges . . . if there were ever an exercise tailor made for doing a single leg, it's this one.  Start standing with both feet apart, bring one leg out, and bring the rear leg knee down until it's just brushing the floor.  Then step forward.


Important Note: Remember to always stretch after lifting!  Stretch your legs, hips, arms, and back after each session and you will GAIN flexibility, not lose it.  Flexibility + Power = Awesome in Jiu Jitsu.  All the usual other disclaimers apply as well.  Start with low weight and perfect your form, then gradually ramp up from there.

Thursday, 6 October 2011

Review: HCK Competition Double Gi


I bought this gi from a website that had it on sale for 120 or 130$.  At the time I didn't have too much cash for training and my priorities were as follows:
- Must be durable
- Must be durable
- Must be durable
The HCK comp double meets all three of those requirements with flying colours.  It's the single thickest/toughest BJJ gi that I've ever found.  The collar is not rubberized anything, it's solid cotton, very thick, and hard to bend.  The jacket can stand up on its own - even after two years of heavy use and regular washing.  People regularly hurt their fingers/hands trying to grab this thing.  I am constantly getting questions about what kind of gi it is.  I've also used it in tournaments with no concern that it was going to be too soft or easy on my opponent's skin.
The embroidered shoulder is one of the only decorations on this gi.  It says Jiu Jitsu at the bottom, but was kinda hard to capture on camera.

I contacted Howard by email with some measurements (6' and around 180 at the time) and he got back to me within a day or two to confirm what sized gi I should be looking for (a size 5 jacket and pair of pants).  It matched the sizing chart on his website pretty well: http://www.howardliu.com/catalog/bjj/sizes.htm .  After washing it a couple of times in warm water the gi and pants shrunk slightly to a perfect fit, both just meeting regulation lengths.  After shrinking the crap out of an OTM gi that I bought I now only air dry my gis.  That said, it hasn't shrunk at all since the first wash.  One thing to note is that the colour faded quite a bit after the first couple washes.  It's been exactly the same ever since though.  In retrospect though I probably should have washed the gi with vinegar the first time to try and lock the dyes in the fabric.  Ah well, live and learn.


This tiny HCK patch on the pants is the only other marking on the gi.
The jacket is cut similarly to a judo jacket, with a strip up the back.  I know that many people complain about this kind of strip, but honestly it's never been too uncomfy to me when playing guard from my back.  The strip is nicely taped on the inside, which might play a part in the comfort level.  Sleeves are slightly wider around the wrist than some BJJ specific gi tops that I've tried, but they're not super baggy.  Everything on this gi is well taped.  The armpits are reinforced with a heavy pad of gi material, the split seam up the side is reinforced with a heavy denim triangular patch, and all of the stitching throughout the gi is heavy duty double stitching.  The collar is thicker than any collar I've felt before.  Maybe good for gi chokes, but sometimes it can get stuck under your back or your neck when you're playing guard . . . and then it feels like you're rolling on railroad ties.


The pants are very good.  They're made of some kind of tough cotton that feels almost like a pair of jeans, soft, comfortable, and tough.  There's a double layer of material from just above the knee down to the bottom of the front of both pant legs.  The drawstring is a flat, thick piece of cotton.  It can be hard to get the pants off after class sometimes when they're soaked in sweat, but I've also never had them start to fall down (or be pulled down) during class.  These pants are a heavy duty fabric . . . and feel very tough.  The single belt loop sucks though.  Seriously, I think that two is the bare minimum that you should have and four is ideal . . . but just one?  It gets the job done I supposed, but if I could change one thing about these pants it would be adding three more belt loops.

Disadvantages?  This has been a good gi, but it's hot.  Not just slightly warm, but we're talking baking in an oven kinda hot.  If you do burpees in your class warmup you'll feel it.  If you're rolling hard for 20 - 30 minutes you'll feel it.  If you train in the summer (and I've trained with this gi on hot, humid summer days) you'll be hitting the water.  Hard.  It's like sauna training all the time.  Maybe it makes you tougher, but it also can make you dizzy and on the verge of passing out.  There's a certain claustrophobic element to wearing this gi that takes some time to get used to as well.  I've found that during warm-ups I have to pull the gi top out of my belt to be able to keep from overheating.

Oh yeah, thinking of making weight for a tournament with this gi?  Hahahaha.  This gi is heavy.  Buick heavy.  You will be fighting people who are heavier than you if you wear this gi into a tournament during your weigh-ins.  The toughness that it gives you, and the discomfort that it will cause your opponents is pretty awesome (cross-facing someone with this gi is like pushing a cheese grater into their face) but it too comes at a price.  The interior of the competition double is as uncomfortable as the exterior.  Your skin will toughen up after a while though.  All of this weight also means that it takes forever to air dry.  My lighter OTM gi is good after a day sitting on the drying rack in the basement, this Howard takes at least two days (with a fan on it).

In conclusion, this gi is designed with a lot of trade-offs.  It's damned near indestructible, has one of the thickest, least bendy collars you can get.  It's tough to grip, great for cross-facing people, and comes with pretty minimal patching/bling (I'd feel too much like a NASCAR driver having dozens of patches and sponsor crap all over my gi personally).  It's also hot, heavy, and takes forever to dry.  Your call as to whether or not it's worth it . . . it's served me well for two years of heavy use, and I suspect it'll still be kicking around another two years from now.  At 225$ on the HCK website though . . . well, although it's a very tough gi, that seems a tad steep to me.  You could buy two Padilla and Sons gold weave gis for that price - and have enough left over to buy a pizza.

Vital Stats (Post Shrinking and more than 2 years of use):
Size: 5
Total Weight (Pants and Jacket) - 7.2lbs (dry)

Jacket Measurements:
Sleeve to sleeve - 57 inches
Shoulder to bottom hem - 30 inches
Cuff diameter - 7.5 inches

Pants Measurements:
Inseam: 27.5 inches
Top to bottom length: 35.5 inches
Cuff diameter: 10.25 inches

Review: Underarmour Heat Gear Long Sleeve Rashguard

Front chest logo
Well, a few years back I'd ordered and recieved my Sprawl shorts for starting no gi grappling.  Everything in my world was getting more awesome and jiu-jitsuy . . . but after a couple classes I realized that cotton t-shirts just don't cut it.  They get drenched, uncomfortable, and I was getting my (and my partner's) hands caught in their wet billowy folds (gross).  That and they were ripping/stretching out of shape pretty easily.  It was time to embark on a quest to find a decent rashguard.  Not wanting to try and order something online I went to the nearest sporting goods store and asked for 'one of those stupid shirts that joggers wear to look like superman'.  The clerk immediately knew what I was looking for and came back with a longsleeve Underarmour Heat Gear shirt.
Stitching that I had to add to the seam at the waist

Stitching that I had to add to the sleeve seam

For something that's not designed for grappling, this shirt has held up pretty well.  I did notice after the first few classes that both sleeves had the stitching start to come loose though . . . so I had to bust out the ole sewing needle and thread to fix that up.  As you can see from the pictures, apparently I didn't have any black thread.  :S  Whatever.  Aside from my sewing modification, this shirt has stood up pretty well to weekly use in grappling, (and occasional use as an undershirt while snowboarding).  I'll add some pics later so you can see where it's starting to get frayed/tattered along the sleeves and back, but I'm hoping to squeeze another year or so out of her.  We'll see what happens.


So, what do I like about this rashguard?  Well, the logo is small and inoffensive (the training bling / billboard effect that so many like just isn't for me).  It's very light weight - you barely know that you're wearing the shirt.  It breathes well and wicks away your sweat to keep you cool/dry.  It works well under a gi to keep you from getting all scratched up (and trust me, my HCK double loves to chew up skin).  Also, the arms are a decent length (more on this later in a review of my HCK rashguard).  Chafing isn't a problem even when rolling for hours at a time.  It's also pretty easily available at just about any sporting goods store.  My main beef with this thing is that (unless you get some kind of special deal on them somewhere) they're just too expensive (45$) up here in Canada.  The stitching coming loose was a bit of a pain, but hasn't been a problem again since my second week of using it.

The Underarmour Heat Gear gets a thumbs up from me if you're in a pinch and need a rashgaurd, or if you can find them for a reasonable price.

Back of shirt

Competition Training - Idenifying Weaknesses


Yesterday was competition training at the gym, we worked positions, did some suicides, and did some rounds.  6:30 - 8:30pm.  It's mostly filled with advanced belts, so this training seems pretty good for helping me find the many holes in my game.

My open guard is still terrible and needs a lot of work.  Especially when people stand up and I try to play half spider/De La Riva guard, I don't know what I'm doing (well, I know what I want to do . . .) and get passed very quickly.

We did a lot of half guard during class (both passing and defending) and I'm in need of some improvement doing both.  Holding half guard I've been working on two thing.  The Eddie Bravo 1-2-3 combo of Lockdown-Jaws of Life-Toss them up is the first.  When I get the lockdown I can usually work through the combo and at least get to my side with an underhook, but the guys in class are fighting that lockdown pretty well.  I need to figure out a way to reliably catch their leg and get lockdown as soon as they start flattening me.  Especially if they bring the leg I'm trying to lockdown up really high.  The other half guard that I'm trying to work (with some limited success) is the one where you've got your ankles crossed and you're using that to help brace your top leg against the guy's hip.  This prevents them from just reaching flattening my top leg to my bottom and coming around the side.  I think that I'm letting them flatten me too much from here and then losing the frame.

Passing half guard usually has me trying to flatten the guy out, put pressure down on his face/chin, walking the caught leg up to the guy's butt and then trying to pull the leg out.  I'll need to ask the instructor what I'm doing wrong, because this pass used to work for me pretty well in the past.

I had several matches yesterday.  My best one was against the pudgy russian and it had nice flow to it:  Engage, fight for left arm underhook, pull, step left leg in, BOOM.  Tai Otoshi.  Damn I love that throw.  Off the Tai Otoshi I landed in side control which I locked in nicely.  Worked from side control to try for scarf hold, but the pudgy russian was framing too hard against my face, and was keeping his lower arm buried.  Switched back to side control, pushed his near knee to the ground and stepped over into mount.  Here's where I had a little trouble.  I grapevined his legs first to flatten him out, and then started working my way up to high mount.  He started trying to push me back low and getting to his side to try and trap a leg.  I worked for an Americana but couldn't get his arm to the mat, then tried to climb up for an armbar and he rolled me.  Mental note: stop trying to rush the subs.  I worked closed guard against him until the end of the match.

Banged the left knee around a bit yesterday, just below the kneecap.  Hopefully it doesn't give me any problems for weightlifting today.

Tuesday, 4 October 2011

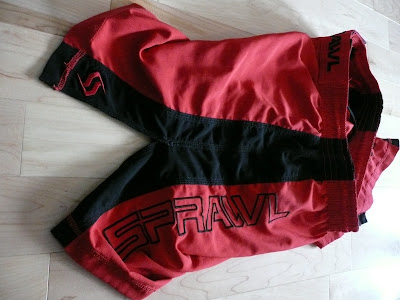
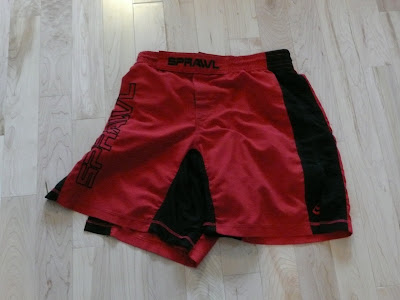
Review: Sprawl V-Flex XT

Embroidered logo on front of shorts
When I started doing no gi BJJ, I wore a pair of soccer shorts that I had kicking around in the closet.  They were flimsy, didn't stay on very well, and tended to expose WAY too much leg when I was playing guard.  Clearly, they weren't going to cut it.  I asked around at the gym trying to find out what people seemed to prefer for this purpose.  I just wanted something comfortable, that was tough, and looked OK.  At least half the guys I talked to recommended sprawl, so that's what I ended up getting.  These V-Flex XT shorts have lasted me more than two years of weekly use and they look identical to the day that I got them.  The only thing that's even slightly worn is the drawstring.  Hard to beat that for longevity!

The fabric that they're made of is a heavy duty "stretch fabric" and it's got a little give to it so that when you come down hard on them at an awkward angle they really don't want to rip.  The material itself is smooth, soft, and breathes very well . . . keeping you cool when needed.  There are two panels sewn into the crotch made of a tough stretch material that give your legs complete freedom of motion (and I'm a pretty flexible guy).  The lightness of these shorts is really something that has to be experienced.  Crazy lightweight!  It almost feels like you're wearing nothing at all.

Inside of the shorts, showing off stitching and the tie string

Stitching is superb and heavily done, double and triple stitched in many places.  The waistband is about two inches thick, and elasticized.  After two years of heavy use the elastic still hasn't given up the ghost which is pretty impressive.  The logos are all stitched in, so there's no fading, no peeling, and they still look exactly the way they did when I bought the shorts.  There's also a pocket on the inside of the front waistband which I've never used.  Seems like a silly place to keep your keys or loose change when you're rolling . . . but hey, maybe you really hate your training partners and want to make guard that much more uncomfortable for them.  Who knows?

The closure system is some heavy duty velcro in addition to the shoestring type drawstring.  I just set the velcro to a comfortable position and then pulled the shorts on and off ever since I've got them, but the velcro has never come undone while rolling so I guess it's adequate.

Sizing was a little odd to me.  I usually fit between a 33 and 34 waist on my jeans, but when I contacted the guy at Sprawl he suggested I get a size 32.  The 32 fits just fine . . . maybe a hair looser than it could be, but I've never had any problem with them slipping down with the drawstring tightened up.

Side slit is pretty big


If I had to nitpick at any details, I'd say that the side slit is a bit higher than necessary.  It comes up 17 cm (6.5 inches for you guys who haven't figured out the metric system yet) which seems a tad higher than necessary.  This hasn't been an issue for me, but I don't think it would matter if they were made only half the height.

Great buy, definitely recommended.  Getting these shorts is a no brainer - just a fantastic product all around.  Since I'm going to do some more no gi classes I recently ordered another pair of Sprawls (the Fusion 2 Fight Shorts) so I'll review those once I've had time to roll in them for a while.

Vital Stats:
Total Height of Pants: 19.5 inches
Side Slit: 6.5 Inches
Inseam: 8.5 inches
Leg opening diameter: 13.75 inches